If you’ve been scrolling through social media lately, you’ve probably seen the upside-down food trend taking over everyone’s feed. I’ll be honest—I’m usually skeptical of viral food trends. Most of them look great on camera but fall flat in real life. But when I kept seeing these golden, flaky upside-down pastries everywhere, I couldn’t resist. I had to try it for myself.
And folks, I’m here to tell you: this one actually lives up to the hype.
As a perpetually busy person who still wants to feed my family something better than cereal or drive-through breakfast, I’ve been making these upside-down ham and cheese pockets on repeat. They’re ridiculously simple, use just five ingredients, and most importantly, they actually taste incredible. Even better, one package of puff pastry makes about 12 pockets, which means you can meal prep breakfast for the entire week in one go.
Let me show you exactly how to make these, because if there’s one trending recipe you try this month, it should be this one.
Why This Recipe Works for Real Life
Here’s what I love about these upside-down pockets: they require zero fancy ingredients. No special equipment. No complicated techniques. Just ham, mozzarella, a bit of Boursin for that gourmet touch, puff pastry, and an egg. That’s it. Things you probably already have in your fridge or can grab quickly at any grocery store.
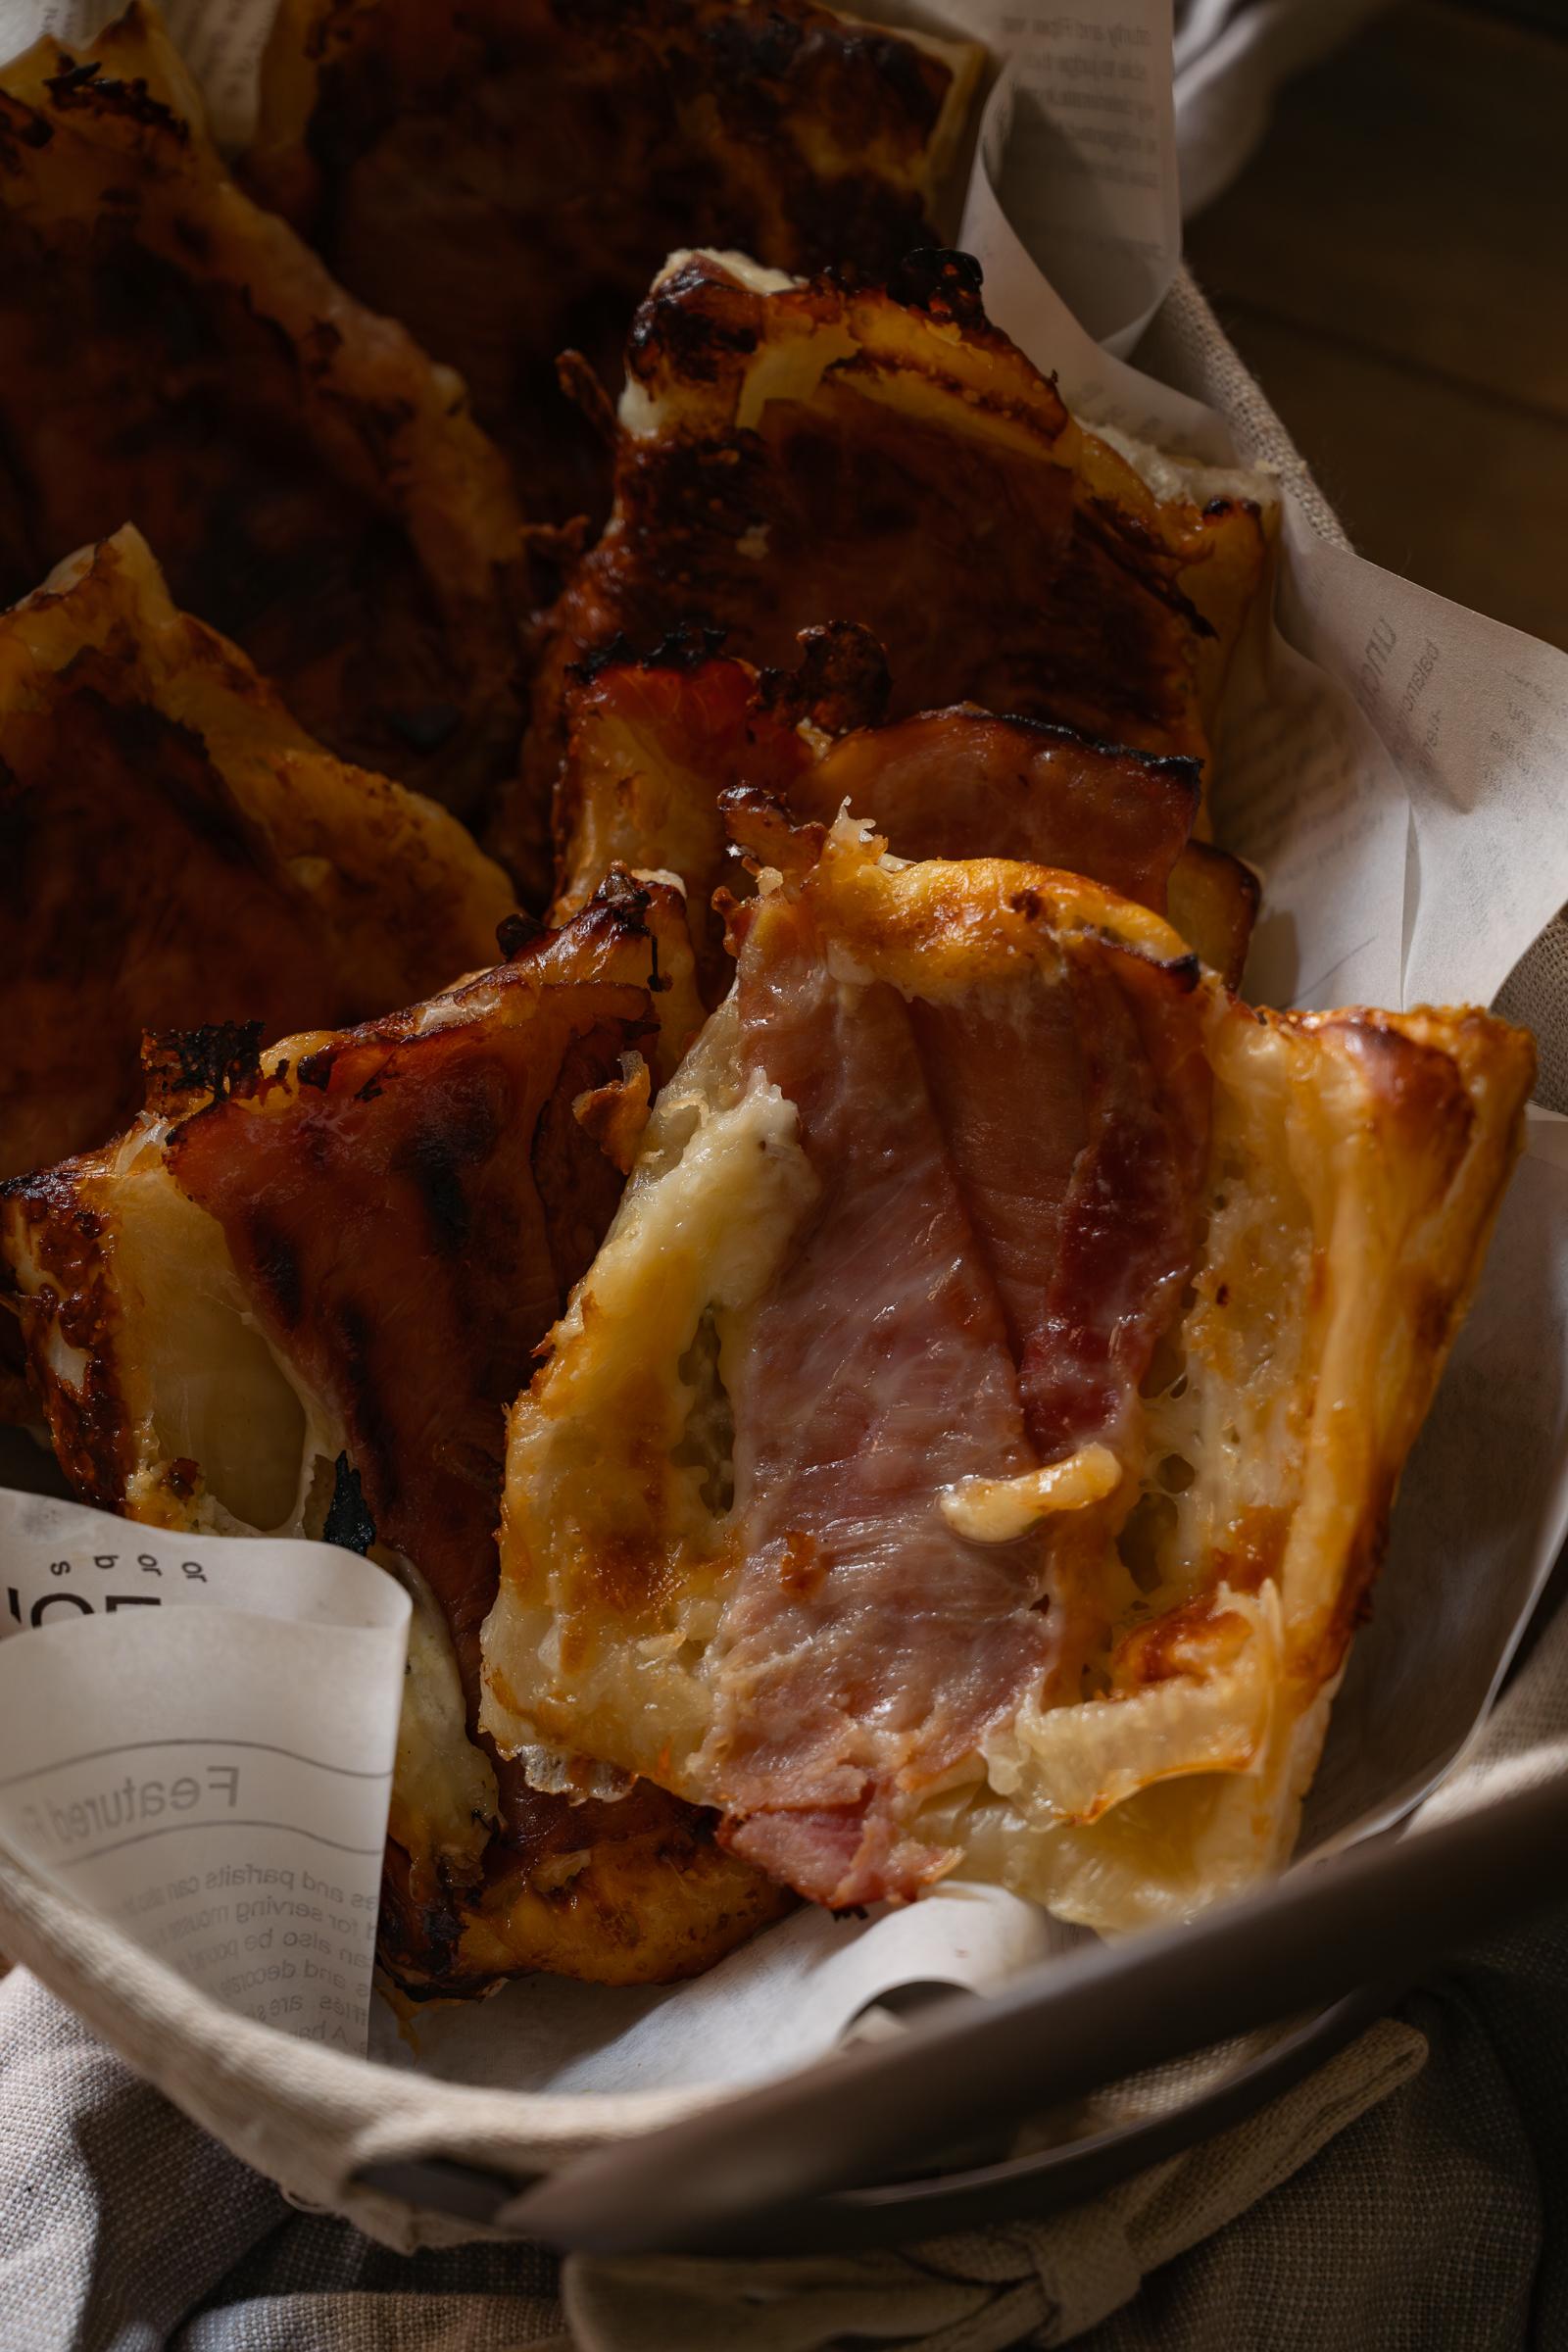
The upside-down method isn’t just for show—it actually serves a purpose. When you flip these after baking, the ham gets beautifully caramelized and slightly crispy, almost like it’s been glazed. The cheese melts perfectly inside, and that little sliver of Boursin garlic cheese adds just enough creamy, herby richness without overwhelming everything. The mozzarella is key here because it balances out the saltiness of the ham with its mild, creamy flavor.
And can we talk about how these are portioned? Each one is an individual serving. No cutting, no serving utensils, no mess. Just grab one from the fridge, warm it up if you want (or eat it cold—they’re good that way too), and you’re out the door.
The Simple Ingredient List
For 12 pockets, you’ll need:
- 1 package of puff pastry (makes about 12 rectangles when cut)
- 12 slices of deli ham (about 6-8 ounces total)
- 1½ cups shredded mozzarella cheese (about 6 ounces)
- 1 package (5.2 oz) Boursin garlic & herb cheese
- 1 egg
That’s it. Five ingredients. No measuring cups full of flour, no lists of spices, no special sauces. This is the kind of recipe that makes weekday mornings actually manageable.
Step-by-Step: Making Your Upside-Down Ham and Cheese Pockets
Step 1: Prep Your Workspace
Preheat your oven to 400°F. Line two baking sheets with parchment paper—this is important because the cheese will bubble and you don’t want to scrub pans later. Trust me on this.
Take your puff pastry out of the freezer and let it thaw according to the package directions, usually about 30-40 minutes at room temperature. You want it cold but pliable.
Step 2: Cut Your Pastry
Once your puff pastry is thawed, unroll it on a lightly floured surface. Using a sharp knife or pizza cutter, cut the pastry into rectangles. Most packages will give you about 12 rectangles that are roughly 3×4 inches each. Don’t stress about perfect measurements—rustic and slightly uneven is totally fine. These are for your family, not a magazine photoshoot.
Step 3: The Assembly (This Is Where the Magic Happens)
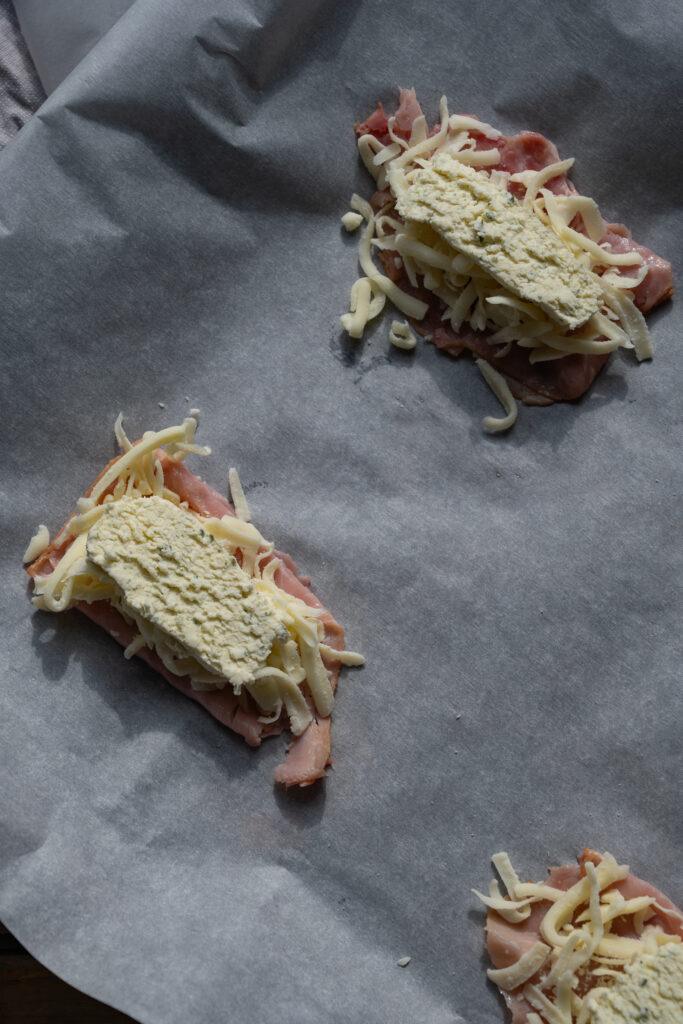
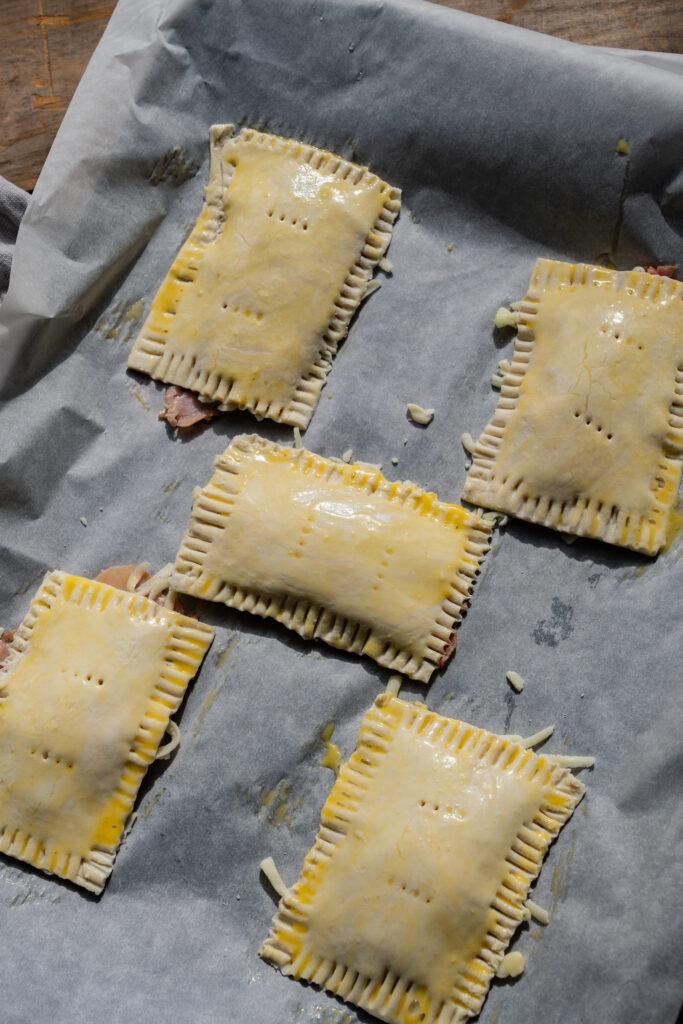
Here’s where the upside-down technique comes in. On your parchment-lined baking sheet, lay out your puff pastry rectangles with some space between them—they’ll puff up as they bake.
Now, working on each rectangle:
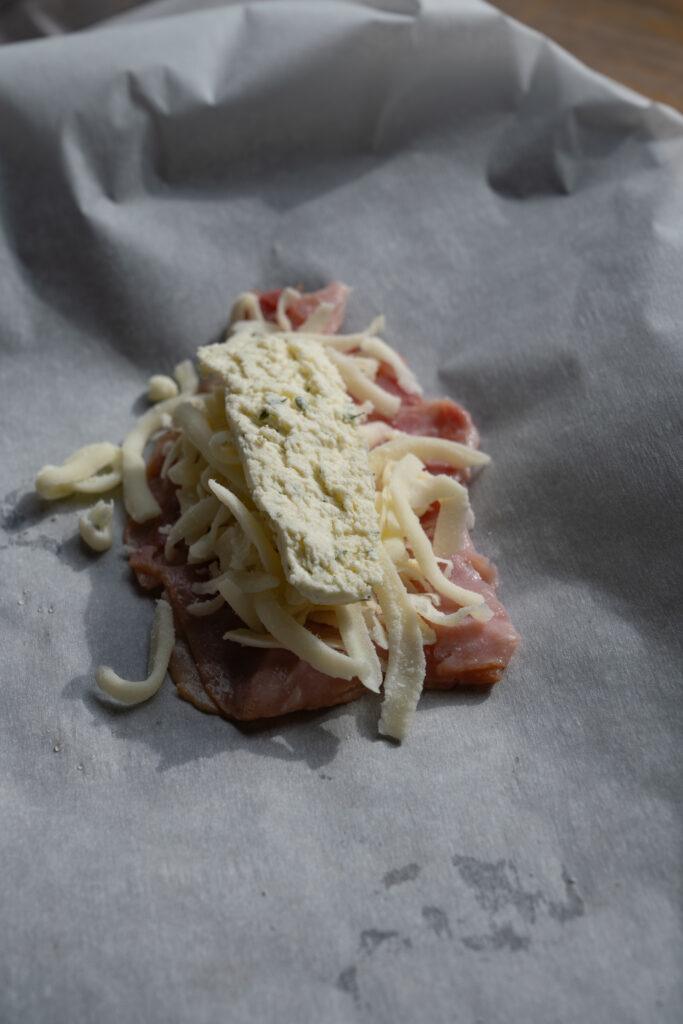
First layer: Ham. Place one slice of ham directly on top of each pastry rectangle. If your ham slice is larger than the pastry, fold it to fit, leaving a small border around the edges. The ham goes right on top of what will eventually be the bottom of your pocket.
Second layer: Mozzarella. Sprinkle about 2 tablespoons of shredded mozzarella cheese over the ham. Don’t pile it too high in the center—spread it relatively evenly. This is your balancing act against the salty ham, so don’t skimp on it.
Third layer: Boursin. Here’s where that gourmet touch comes in. Take a small sliver of the Boursin garlic cheese—about half a teaspoon to a teaspoon—and place it right in the center of the mozzarella. You don’t need much. That garlic herb flavor is potent and a little goes a long way. The Boursin will melt and create these amazing creamy pockets of flavor.
Step 4: Top and Seal
Take another rectangle of puff pastry and place it directly on top of your ham-cheese stack. Now comes the crucial step that makes these actually stay together: take a fork and press down around all four edges of the rectangle.
This fork-crimping technique does two things. First, it seals the two layers of pastry together so your filling doesn’t escape during baking. Second, it creates that pretty crimped edge that makes these look like you actually knew what you were doing. Press firmly enough that the tines of the fork go through both layers of pastry and create a seal, but not so hard that you tear through the dough.
Go around the entire perimeter of each pocket. This takes maybe 10 seconds per pocket, but it’s the difference between a neat, contained packet and a cheese-leaking mess.
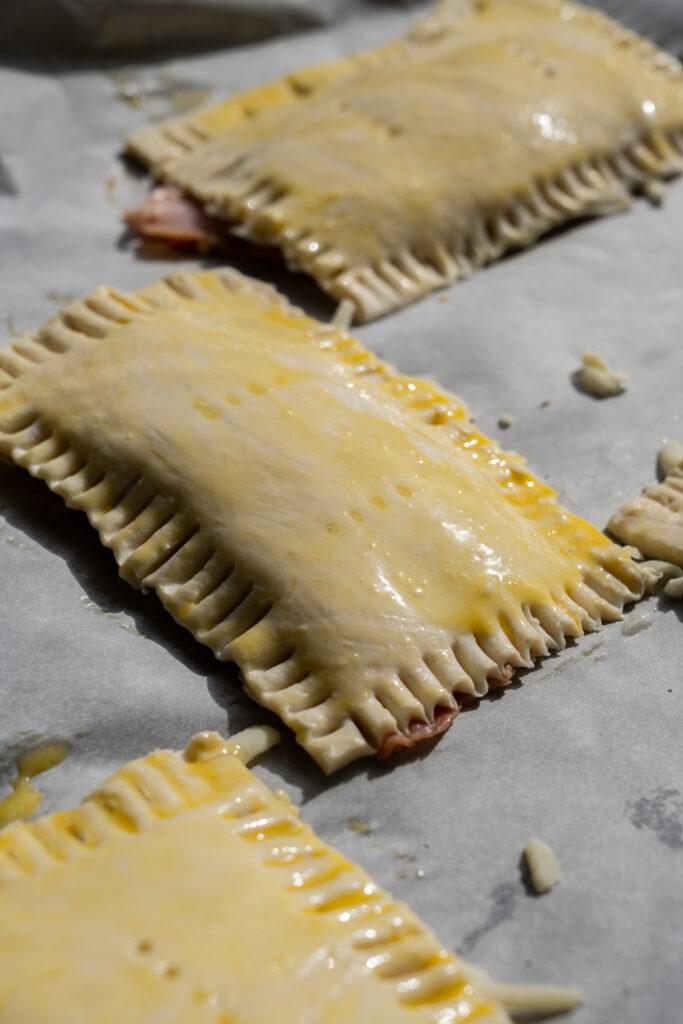
Step 5: The Egg Wash
Crack your egg into a small bowl and whisk it with a fork until it’s completely combined—no streaks of white should be visible. This is your egg wash, and it’s what’s going to make these turn that gorgeous golden brown color.
Using a pastry brush (or honestly, your fingers work in a pinch), brush the top of each pocket with the egg wash. Make sure to cover the entire surface. The egg wash isn’t just for color—it also helps the pastry achieve that crispy, flaky texture and gives it a bit of a glossy sheen that looks really professional.
Step 6: Bake
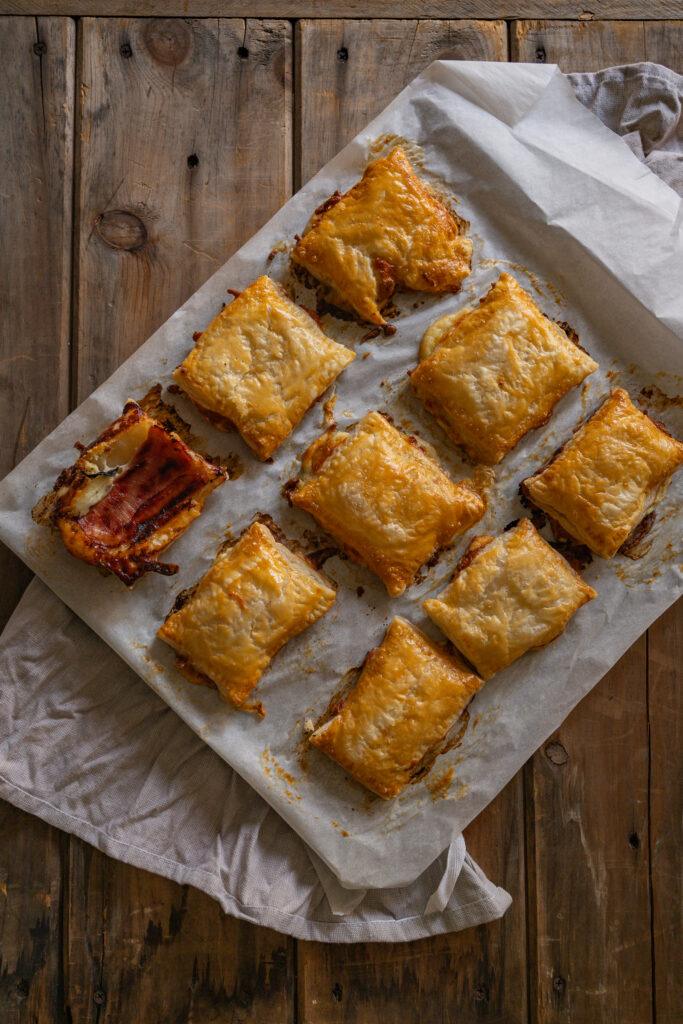
Slide your baking sheets into the preheated oven. Bake for 18-22 minutes, until the pastry is deeply golden brown and puffed up dramatically. Every oven is different, so start checking around the 18-minute mark. You want a deep golden color, not pale blonde.
The smell in your kitchen during these 20 minutes is incredible—buttery pastry, melting cheese, and that hint of garlic from the Boursin. It’s the kind of smell that gets everyone out of bed without you having to yell upstairs.
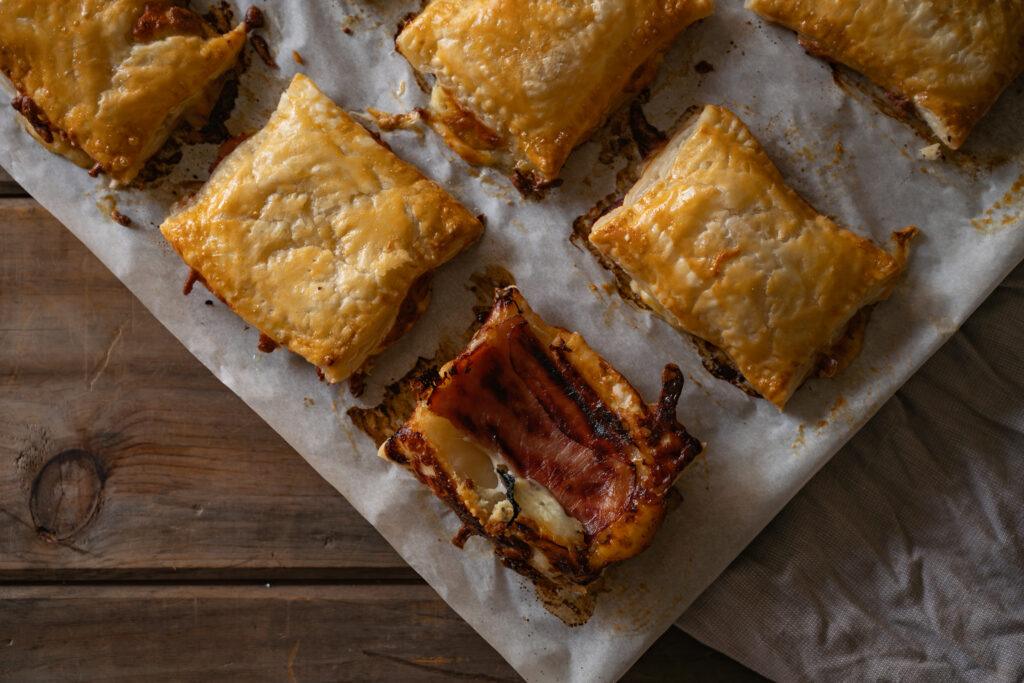
Step 7: The Flip
This is it—the moment that makes these “upside-down.” Let the pockets cool on the baking sheet for about 3-4 minutes. You need this cooling time so the cheese sets slightly and doesn’t run everywhere when you flip.
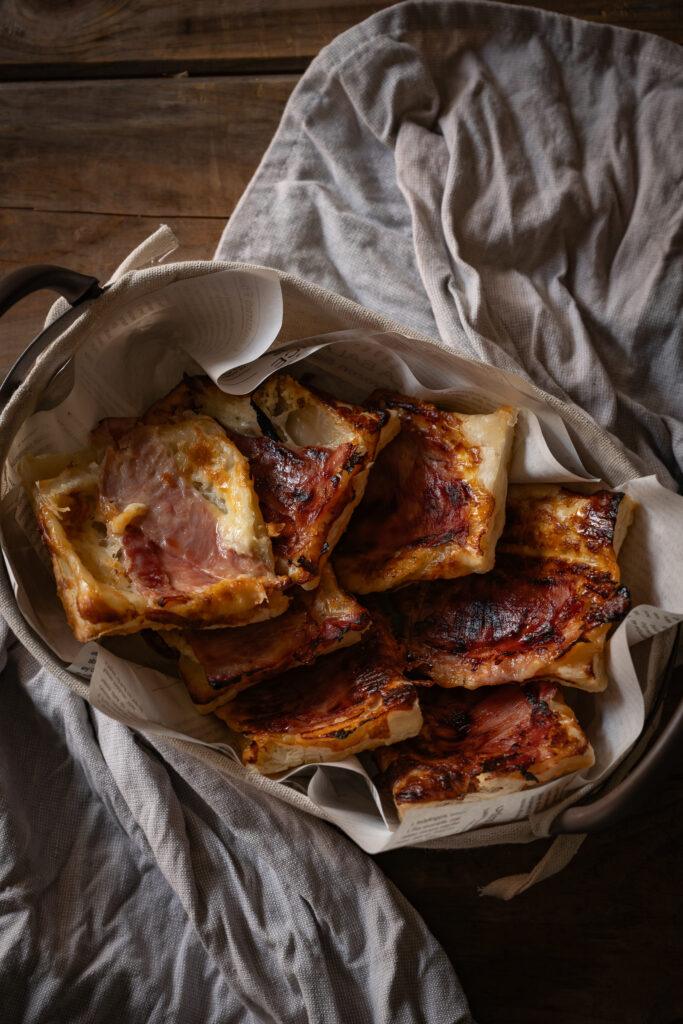
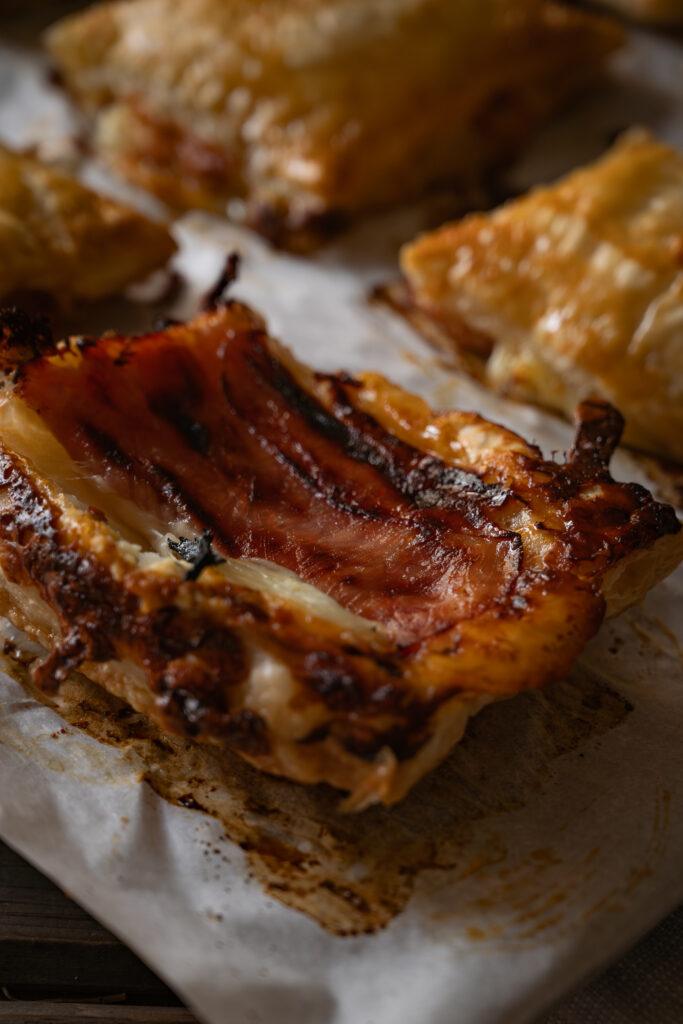
Using a spatula, carefully flip each pocket over so the ham side is now facing up. That ham will have caramelized beautifully against the hot pan, creating this gorgeous, slightly glazed appearance. Any cheese that bubbled out will have crisped up into these amazing little cheese crisps around the edges.
This flip is pure Instagram moment material. That golden, slightly caramelized ham on top just looks impressive.
Serving Ideas
These are incredibly versatile. For breakfast, serve them with:
- Fresh fruit on the side
- A simple green salad if you’re feeling virtuous
- Hash browns if you’re feeling indulgent
- Just grab and go with a coffee if you’re running late
They’re also fantastic for:
- Brunch spreads (make a double batch and watch them disappear)
- Lunch boxes (kids and adults alike love these)
- After-school snacks
- Road trip food (they travel really well)
- Game day appetizers
The best part? They’re genuinely good at room temperature. You don’t have to reheat them if you don’t want to, though a quick 30 seconds in the microwave or a few minutes in a toaster oven makes them warm and gooey again.
Make-Ahead Magic for Busy Mornings
Here’s where these really shine for busy families. You can prep these in several ways:
Fully Baked and Stored: Make the full batch of 12, let them cool completely, and store them in an airtight container in the fridge for up to 5 days. Reheat individual pockets in the microwave for 30-45 seconds or in a 350°F oven for 5-7 minutes.
Freeze After Baking: These freeze beautifully. Let them cool completely, wrap each one individually in plastic wrap, and freeze for up to 2 months. Reheat from frozen in the oven at 350°F for about 12-15 minutes.
Assemble and Freeze Unbaked: You can actually assemble these completely (minus the egg wash), freeze them on a baking sheet until solid, then transfer to a freezer bag. When ready to bake, brush with egg wash and bake from frozen, adding about 5 extra minutes to the baking time.
Sunday meal prep has never been easier. Two baking sheets, 30 minutes of work, and you’ve got breakfast sorted for more than a week.
Why the Upside-Down Method Actually Matters
I was curious about this when I first saw the trend—is flipping them really necessary, or is it just for the ‘gram? Turns out, it genuinely makes a difference.
When the ham sits directly on the parchment paper during baking, it gets direct heat from the bottom of the oven. This caramelizes the natural sugars in the ham and creates a slightly crispy, golden surface that you just don’t get when the ham is sandwiched in the middle. It also renders out a tiny bit of fat from the ham, which bastes it as it bakes.
The cheese, protected by the top layer of pastry, melts perfectly without burning or drying out. And that top layer of pastry (which becomes the bottom after flipping) stays crispy and flaky because it’s not sitting on top of moist ingredients.
It’s not just a gimmick. The upside-down method actually creates a better texture and flavor. Plus, it looks really cool, which doesn’t hurt.
Troubleshooting Common Issues
Cheese is leaking out everywhere: Your fork crimping wasn’t tight enough, or you overfilled them. Use a little less cheese next time and make sure you’re pressing firmly with the fork around all edges.
Pastry isn’t puffing up: Your puff pastry was too warm when it went into the oven. Keep it as cold as possible until the moment it hits the oven. Also double-check that your oven is actually at 400°F—oven thermometers are cheap and really helpful.
Bottom is getting too dark: Your oven might run hot on the bottom. Try placing the baking sheet on a higher rack, or put an empty baking sheet on the rack below to act as a heat shield.
Ham is too salty: This happens with some brands. Next time, use the mozzarella suggestion more heavily—add an extra tablespoon to really balance that salt. You can also look for lower-sodium deli ham.
Variations to Try Once You’ve Mastered the Basic Version
Once you’ve made these a few times, you can start playing around:
Turkey and Swiss: Swap ham for turkey and mozzarella for Swiss cheese. Use the Boursin the same way.
Breakfast style: Add a scrambled egg patty (cooked and cooled) between the ham and cheese layers.
Veggie version: Skip the ham and use thinly sliced roasted red peppers, sautéed mushrooms, or fresh spinach.
Extra herbs: Sprinkle some fresh thyme or oregano over the mozzarella before adding the Boursin.
But honestly, the basic version is so good that I rarely mess with it. Sometimes simple is best.
The Real Talk: Is This Actually Easy Enough for Busy Mornings?
Let’s be real for a second. When recipe bloggers say something is “quick and easy,” it often means it’s quick and easy for someone who has unlimited counter space, every kitchen tool ever invented, and no toddler hanging on their leg.
These upside-down ham and cheese pockets are actually legitimately easy. The ingredient list is short. The technique is simple—layer, seal with a fork, brush with egg, bake, flip. That’s it. No complicated folding techniques, no blind baking, no tempering chocolate or whatever else food bloggers ask you to do.
The assembly line approach makes it even easier. Get all your rectangles cut out, then go down the line adding ham to all of them. Then cheese to all of them. Then Boursin. Then top all of them. Then crimp all of them with the fork. This assembly line method is way faster than making them one at a time.
If you involve kids, they can totally help with this. The crimping with the fork is actually a great job for little hands. They’ll feel proud seeing something they helped make come out of the oven looking so impressive.
Why I Keep Making These
I’ve tried a lot of viral food trends. The baked feta pasta. The cloud bread. The various TikTok smoothies that look better than they taste. Most of them are fine, but they don’t stick around in my regular rotation.
These upside-down ham and cheese pockets have stuck. I’ve made them probably 20 times since I first tried the technique, and I’ll keep making them because:
- They actually taste really good—like, genuinely delicious, not just photogenic
- My family will actually eat them (kids included)
- They make busy mornings manageable
- They use real ingredients I feel good about serving
- The prep-ahead options mean I can have homemade breakfast without waking up at 5 AM
That combination of actually being tasty, genuinely simple, and truly useful for real life is rare. Most recipes nail two out of three. These nail all three.
The Bottom Line
If you’re looking for a breakfast solution that doesn’t involve expensive drive-throughs or the same boring bowl of cereal, try these. If you’re meal-prepping lunches and running out of ideas, try these. If you’re hosting a brunch and want something that looks impressive without being complicated, definitely try these.
The upside-down trend caught on for a reason—it works. And this particular application, with ham, mozzarella, and a hint of Boursin garlic cheese wrapped in flaky puff pastry, is one of the best versions I’ve tried.
Make a batch this weekend. Your busy weekday mornings will thank you. Your family will thank you. And when someone asks you what smells so good, you can casually mention you just whipped up some upside-down ham and cheese pockets, no big deal.
Sometimes the trending recipes are worth the hype. This is one of them.
Happy Munching,
<3 Ann